Showing posts with label tables. Show all posts

HOW TO BUILD A CONSOLE TABLE - furniture recycling


This will feel like deja vu to some of you that the last post about the first gate leg table I did. I had two of them marked at $5 at our yard sale yet neither sold. I always feel bad for the stuff left behind and it some how re-invigorates me to find the time to give things a second chance.


Pin It Now!

SHABBY CHIC LAYERING PAINT - distressing white over color


I had 3 little side tables come to me  painted in vibrant colors. The paint jobs were poor and rough with runs here and there but this made for great paint layering and fun distressing.

Pin It Now!

FURNITURE MAKE OVERS - before and afters 2


Here are some BEFORE and AFTER photos from the furniture makeover weekend I haven't gotten
 around to showing yet. This event offered a place to work, access to a skilled professional (that's me)
 and like minded women to meet and share ideas with. I had a wonderful time meet with
 these different women and was honoured to work with them on their projects. They also had passed a
 thank you card around the class during the final day for every one to sign. The truth is I got whiff of it
 in advance and thank fully I did cause it's those darn things that will make me tear up when you
 catch me off guard. Please enjoy these pictures and take away some ideas and inspiration of what
 you can do. I'll start with this short dresser that was already converted into a blanket box. The drawer
faces were fixed in place and the top was hinged. Now there is a great idea!


*************************
 

Pin It Now!

PRETTY SHABBY CHIC SOFA TABLE - annie sloan console


I just wanted to share a
little project I finished up ...


Pin It Now!

FURNITURE MAKE OVERS - behind the scenes


All these photos are in progress shoots from my Furniture Makeover Weekend.
 
 
The idea for a furniture makeover weekend started 8 months earlier. I believe it also started much
smaller but since we would have to travel to the location I suppose the coordinators figured to get the
 most out of it while we were there. Lots of projects can be finished in a day but the idea was for
everyone to learn from all the different projects though out the weekend not just their own.

 
I've taught class before and I've managed 20 staff but you just never know what you are in for the
 first time you do anything big. As the chosen weekend got closer I found myself pretty calm,
and eager to take on the challenge. I got to go shopping for supplies in the last week and get
 everything packed. I still didn't know what every project was so I had to pack in anticipation.
Once upon a time I was a Girl Guide so I am always prepared.

 
We arrived early Saturday morning and met the ladies from LNT group. There wasn't much time to
met and greet, we had to find a sink to set up the paint mixing and figure out the area to spray
outdoors. My tool boxes would also have to found their way to the second floor where we were setting up. Long industrial tables circled the room in preparation for all the students to work on.

 
Before I knew it students were arriving and projects were appearing on the tables.
THE CONSULTATION ... 18 of them!
I had to talk with each person to find out what they wanted out of their furniture piece.
Repairs, additions, color, and finish, some projects evolved right there in the 2 hours, but I had to move along to get everyone focused and working.

 
I recall asking a group of ladies at the sink "what time is it" the response was "10 to 12
almost lunch". My reaction "is that it" made them laugh. Well at least it was lunch time!
I was in the Twilight Zone, time meant nothing to me as I ran from here to there seeing each
anxious smile wanting my attention. I would get half way through a leg install and be off again
down stairs to mix paint, which was on my way to saw the lumber I needed to finish the leg install.
 
 
By early afternoon on day two I started to notice things slowing down and coming to a finish, I could stop and talk with a student for a few minutes, I could pick up a rag and help them buff their finish, we were standing pieces up and admiring them as they were done. That was the goal and we did it! 


Pin It Now!

OVER SIZED COFFEE TABLE - livingroom side tables

 
March is here and so is the sun!
We had a nice fat rain storm on Saturday which seemed to wash winter away.
 
 
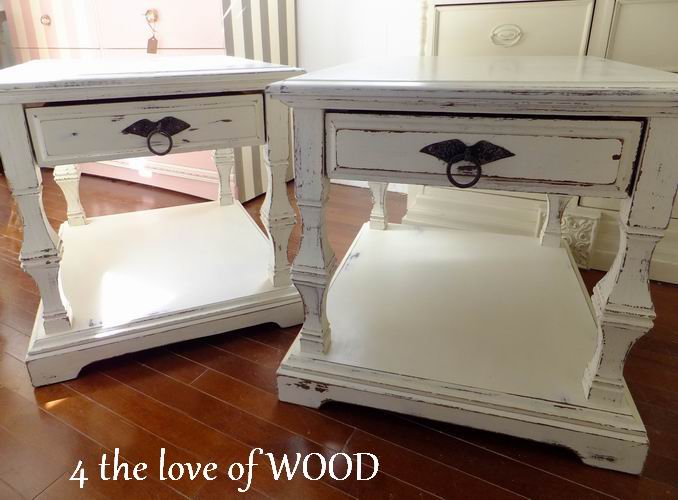
I was able to get these 2 chunky side tables outside and get them sprayed.
They are finished in a creamy white over dark oak.
 
 
George found this pair somewhere in his travels.
I will admit I didn't care for them at all but he pleaded with me to rework them.
They were so dark and dungeon like and the drawers were all wonky.
So to make the man happy I fixed & replaced the broken bits and did a heavy and chippy distressing.
 
What do ya know they look amazing now, maybe he's learning something?
 
All the girls around here like to say
"We all need a George"
but I got the original!


If you push them together side by side they would make an amazing overside coffee table as well.

 
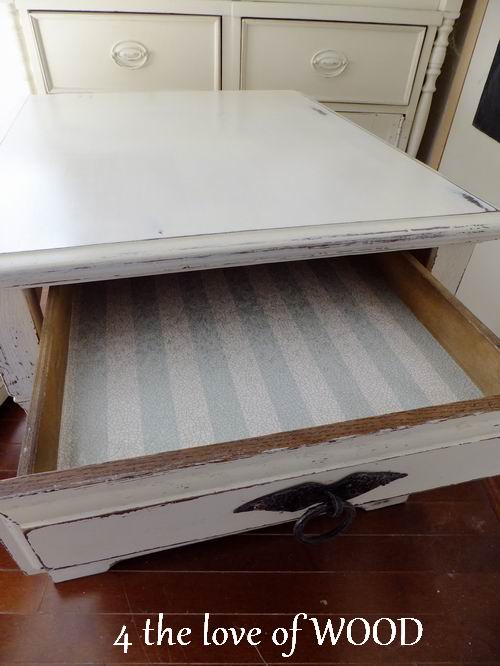
Great tv remote storage, they each have a long drawer I added a vintage blue and
white wallpaper liner and a rustic iron ring pull to the front.


Pin It Now!

WARMING UP WHITE- shabby chic coffee table


The weather today is rainy and curling up in a furry blanket would be wonderful.
Pin It Now!

HOW TO BUILD A CONSOLE TABLE - using an ammo box


I'm re-sharing this post
with more building details
for others who want to re-
purpose their own ammo
box.


Pin It Now!

SCROLLED WOOD WORK - Parlour Table


Okay this post can't wait any longer. It is long over due as I finished this table, Parlor Table that is, days ago. However I have lost the before picture. I know there was one taken I have seen it, but do you think I can find it ... NO!
Pin It Now!

PAINT BLEEDING with ANNIE SLOAN CHALK PAINT- white mid-century cabinet


Have you had trouble with
your paint bleeding and looking for a solution to fix it?


Pin It Now!

FIXING FLAWS - sigaut table


While working on this cute table I got a call from someone looking for a cute table,

  
so needless to say this table found it's new home right away.


When I first saw the table, there was nothing wrong with it ... so I thought!

BEFORE
But when I started to work with the table I realized how wobbly it was.
It really was not safe to put a lamp or other breakable items on.
Upon further inspection I found it unscrewed into more pieces than expected.

That including 3 individual legs, the leg connector, the center post, and finally the top.


There seemed to be a design flaw with how loose the legs fit into the connector,
causing the table to weeble wobbled all over.


So I fixed it and took photos to share with you how it was done.

First of all I would always suggest putting screws in a discreet or hidden area but
this time around the strongest fit was going to be out in the open.


It is always best to pre-drill and counter sink your screws.


Wood glue is amazingly strong ... so if you got it, use it!


I used 3" wood screws that go right through to hold the leg on the opposite side.


Then all you have to do is fill over the screw heads, sand and paint.


Nice and sturdy now.

And to keep you in the loop of what is coming


I'm working with a 1930's china cabinet, this one is taking some time because my ideas are grand,
 an antique desk chair for a birthday girl, and this fabulous desk shown below. 


Special THANK YOU to Darcie for the heads up on this desk.


Pin It Now!

A TALE OF TWO TABLES - recycling an antique table


What do you do if you have a beautiful hand crafted dining table and no room for it in the dining room?
Pin It Now!

CANE CONSOLE TABLE MAKEOVER - painted distressed white


I did a light paint project with some Annie Sloan Chalk Paint in Pure White.


Pin It Now!

CONSOLE TABLES - 2 different styles


I have been planning to do this kind of project for quite some time and really enjoyed creating these from recycled vintage desks.


Pin It Now!

TYPOGRAPHY FURNITURE - tables and stools


It started with a simple stool and grew from there.


When I finished this typography stool I knew I wanted to do more.


This great little side table and the matching coffee table
came from MRS. Perkins, one of George's many beloved customers.
The were both falling apart and she was tired of dealing with them any more.


Now you need to know that Mrs. Perkins is a Scottish fire ball whom I've met on many occasions.
She even had me do some repairs in her apartment.
She is such a kind and fun lady so I needed to fix up these pieces just right. 


They both look amazing.
 

Sharing at:
Miss Mustard Seed's Creative Blog

Pin It Now!

Email your Questions or Comments

Name

Email *

Message *

POPULAR ARTICLES

Your first stop for vintage hardware