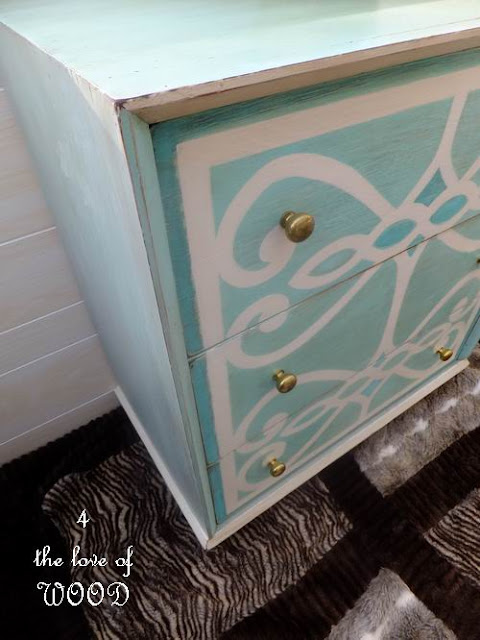
I wanted a nicer back drop for a shelf I had. I also had a big broken lattice panel we didn't have a use for any more. Thus an idea was born. Please enjoy this upcycle project that I did using the left over lattice to create this stunning look on a piece of furniture.
Showing posts with label three drawer chests. Show all posts
Showing posts with label three drawer chests. Show all posts
HOW TO RECYCLE OLD LATTICE - wood and white
I wanted a nicer back drop for a shelf I had. I also had a big broken lattice panel we didn't have a use for any more. Thus an idea was born. Please enjoy this upcycle project that I did using the left over lattice to create this stunning look on a piece of furniture.
A HUSBANDS INVESTMENT - soft blue 3 drawer chest
Before I knew it George was bidding on a three drawer chest
at our very first auction.
I was some what shocked as we had not looked at the piece before the bidding started
and we didn't have a good view of it from where we sat.
With in moments he had won and was holding his number up to the auctioner.
I quietly whispered to him "that's more then I would normally spend
and I don't know that I even want that"
and we didn't have a good view of it from where we sat.
With in moments he had won and was holding his number up to the auctioner.
I quietly whispered to him "that's more then I would normally spend
and I don't know that I even want that"
"It's my investment, I'll get good return on it when you re-do it"
For those of you who have got to know George he can be quite the character
best friend, supportive hubby, and even has a good idea now and then.
There are some elements I just don't mention often enough when
revamping icky furniture such as ...
#1. Creatures that have come to call these places home.
This dresser housed one partticulary large monster of the 8 legged variety.
(NO VISUAL)
#2. The *stuff* that builds up from use over time behind the hardware,
These are the moments I wonder ...
is blasting the entire unit with a garden hose really such a bad idea?
#3. Remembering to turn your project upside down when you start offers so many benefits.
You can vacuum out the insides so much easier,
the top surface is protected if you don't intend to paint it,
it's much easier to see and deal with repairs needed on the underside,
and no crawling around on your hands and knees to paint.
 |
| Pure White mixed with Provence ASCP |
Above you can see the difference of the untouched side panel
and the sanded side shelf and drawer faces.
Once wax is applied to the distressed paint the color pops again
and the distressing stands out.
 |
| Stripped and Sanded Top |
 |
| Stained Top |
 |
| 4 Coats of Poly Applied |
The top of this piece turned out magnificent.
This chest would be a great bathroom vanity.
These pretty side panels with shelf are just waiting for someone
to install hanging racks to display guest towels.
George's investment is finished and a good friend of his is now the proud owner.
Sharing at:
UNION JACK DRESSER how to paint
Sonja had fallen hard for my first Union Jack dresser
but only found it after it sold to someone else.
She later signed up for my workshop
and reminded me of her interest if I was to complete a similar piece.
Her patience has paid off as the second one has recently been completed,
and it's all hers.
This bow fronted chest was original purchased by my mother
in 1968 at a second hand shop for $4.
I honestly can't remember when she passed it on to me
but I can remember how she hated the drawers always getting stuck on her.
I gave it a fresh coat of white paint and added the appliques
many years ago but never did the fixes it needed.
So the first thing to do was get all the drawers running smoothly.
I removed the top so I could work inside easier and strip and stain it later.
One problem was the top drawer.
The bottom had separated and kept getting hung up half way open.
A second issues was all the drawer glides inside needed to be refit.
So I installed new ones made from some nice hard wood stolen from a parts dresser.
Now onto the task of getting the flag pattern marked out.
I've done 2 dressers, 4 chair seats, and a little something else all in the Union Jack
pattern and still never find it easy to get it perfect.
Patience is a prerequisite for this project.
I used red chalk paint
(which I do not recommend using)
and navy craft paint
When I tried to distress the face the fine dust of the red chalk paint would stain
the neighboring white paint.
When I tried to wax the red chalk paint it would also stain the white.
The craft paint doesn't do this.
So after fussing and trying to fix the white I re taped the flag
and took it outside and sprayed the white to get a fresh crisp look again.
The original round posts that stopped the drawers from pushing too far inside had
worn large gouges in the wood at the bottom edge of each drawer.
So before taking her outside I fixed the stops so all the drawers would sit
flush with each other making the second taping a bit easier.
The final step was to get the top looking rich and feeling luscious to the touch.
I stripped it with acetone and stained it with Kona stain
Then took a few days to lay on several coats of poly.
Here she is in all her glory!
NOW IT's YOUR TURN TO TRY ONE CARRIE!
Sharing at:
A LITTLE MILK PAINT - turquoise country cabinet
I used a little sea green milk paint to achieve a great antiqued or aged effect on this country cabinet I finished.
Subscribe to:
Posts (Atom)
Email your Questions or Comments
POPULAR ARTICLES
-
I hate seeing vintage furniture made of real wood get discarded . Folks just can't see the potential. That's what happene...
-
(#1) Appliques and wood decorations are a fun and clever way to add ornate design to a furniture or cabinet project. Wood appliqu...
-
Did you install some trim in your home and lost steam when it came time to hide the finishing nails? You can always go back la...
-
I had the task of making two benches from one old baby crib. This is a look at how I built the first one and the paint finish I used...
-
Learning how to use dark wax can be tricky. Using it on white paint can be terrifying . I have done a short video showing h...


