

Yesterday I shared photos of this old world finish I created on an MDF coffee table. Today I will share the steps I took to achieve the look.


*******************************************

SUPPLIES I USED
to create the top of the coffee table
coffee table already painted turquoise
large medallion stencil (Michaels)
butter cream colored chalk paint (AnnieSloan)
grey colored chalk paint (AnnieSloan)
dark wax (AnnieSloan)
rubber glove (applying dark wax)
180 grit sand paper
paint brush
paper towel

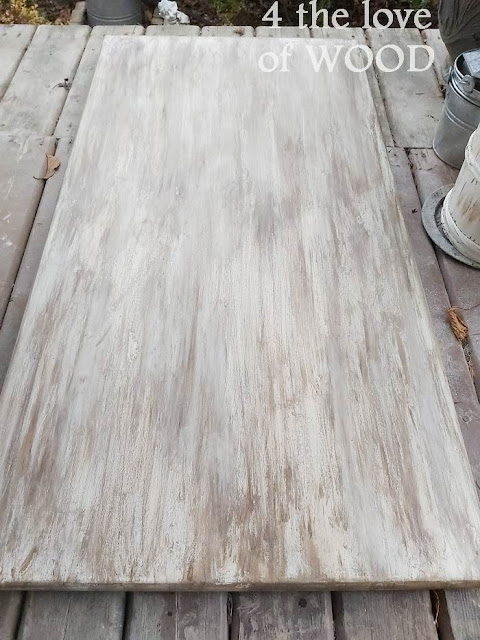
STEP #1
create a back ground for my stencil
I wanted the look of wood but the table top was made of MDF
so I faux painted a weathered looked across the entire table top

Layer 1 - complete coverage of butter cream paint, brushed in one direction
Layer 2 - patchy, streaked layer of grey paint brushed then ragged in one direction
Layer 3 - streaked layer of dark wax ragged in one direction

When layering the paint and wax in the same
direction it helps to create the look of wood grain.
direction it helps to create the look of wood grain.

STEP #2
create a barrier to protect the background effect
I let the paint and wax cure for 24 hours then I took it outside
and gave it a spray clear coat using a water based Varathane.
I just wanted enough barrier in case there was any issues with
the next step ... the stenciling. If I had to wash something off
or correct something this barrier would help protect the
background I just worked on.

STEP #3
stenciling the medallion on the surface
I measured the stencils position from side to side before
starting to make sure it was centered. Rather than using tape
to hold it down I found it easy to keep in place with one hand
while applying the paint with the other. The size of this
stencil and the thickness helped keep it in place.
starting to make sure it was centered. Rather than using tape
to hold it down I found it easy to keep in place with one hand
while applying the paint with the other. The size of this
stencil and the thickness helped keep it in place.


Using the butter cream paint color, I worked in quarters
as I pounced my dry brush over the stencil. Once one
medallion was complete I lifted the stencil carefully
off the project then washed the stencil clean in the sink.

With a cleaned and dried stencil I started on the second
medallion. Once again measuring it's position.

Each time I finished one of the medallions I washed the
stencil and dried it. This helps keep the project clean and
avoid mistakes and bleeding of paint under the stencil edges.

*******************************************


STEP #4
Distress the edges
Using the 180 grit sand paper I distressed the edges
of the table top so the turquoise would stand out.

STEP #5
Apply a clear coat for protection
I used wipe-on-poly by Minwax. I applied 6 thin coats over 4
days, sanding lightly between each coat. This knocks down
any air bubbles that might occur and remove any lint that
might have fallen before it set. The final layer is a nice wax
and buff over the clear coat.
Please note: wipe-on-poly yellows white paint


INSTAGRAM @4_the_love_of_wood
********************************
Advertisement


