I created this chair for a charity event we have locally to support the Christmas Bureau. I also photographed each
step to offer some guidance to others who want to try it themselves.
The live auction chairs made approx. $1400 for the Langley
chairs that were up for silent auction. Thank you to everyone
who participated, donated, and came out for the evening.
But it's time to get to the nitty gritty ...
The ins and out ..... all my little secrets how you
can create your own upholstered chair
***FOREWARD***
First of all let me say I have no formal training in upholstery,
I have always been too impatient to wait for someone to help
me when I want to get a job accomplished. I also like knowing
how things work, thus why I use to take things apart as a
child, like music boxes and flashlights. I would tinker away
for hours figuring out how each little part effected the next.
It's the exact same thing today, if I don't understand how
something goes together I take something similar apart and
learn how to recreate it.
I was fortunate enough purchase this chair already stripped
of all it's old fabric. I've said it before and I'll say it again "the
worst part of reupholstering is removing the old stuff"
So I got lucky with this one.
I started by stapling painters drop cloth over the springs and seat frame.
Next I hauled my roll of inch thick foam in to start cutting.
I ended up using 2 layers of foam for the seat.
Get your butt in the chair and test how it feels, as
Get your butt in the chair and test how it feels, as
Goldilocks would say "that's just right"
One tip I have to offer here is to turn the square edge of the
foam down while stapling. This helps eliminate the corners
being seen after the fabric goes on.
foam down while stapling. This helps eliminate the corners
being seen after the fabric goes on.
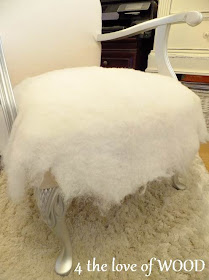
After the foam is secured into place sheets of batten were
wrapped over the foam, this again softens the edges and
disguises the staple indents.
wrapped over the foam, this again softens the edges and
disguises the staple indents.
****************************************
I did not staple the batten as it stays in place on its own.
You can use scissors to cut your batten but tearing
it helps thin the edges better.
Now it was just a matter of cutting and stapling my material
over the seat and backrest, cutting to fit where necessary.
I'm not an expert at fitting around the arms but I do my best.
The piece for the very back of the chair was cut 1 inch larger
and in the shape of the back then carefully secured into place
with my trusty hammer and nail head trim.
I talk about the silver paint finish used on the frame here:
and the Union Jack upholstery was done the same as these
chairs:
The colors I used to paint the chair fabric were
Annie Sloan Chalk Paint in Burgundy and Graphite.
Please let me know if you try making your own
UNION JACK CHAIRS!
UNION JACK CHAIRS!


